Do you know how many do totalizing the visitor which have paid a visit to your blog? where are they come from? search engine or other blog?
If you feel to confused about the question, the answer is you need a tool to know all of that. To get the tool, you can look for it in internet. And don't worry about money because many sites provide this service for free of charge, one of them is http://www.sitemeter.com.
By using the tool from this site, hence you as blog owner will know how many do totalizing the visitor which have paid a visit to your blog, where from they come, what is from search engine or not, with what keyword do they pay a visit, and also still many other function.
This is an example for site meter tool :

Interest to install site meter tool at your blog? please following the steps :
Next step is adding site meter code to your blog. Please follow the steps :


Now you have a Site Meter tool at your blog, until now you will know the statistic of your blog.
Beside sitemeter.com, also you can use tool from http://extremetracking.com.
See you at my next tips. happy blogging ![]()
Add a Statistic and Tracker to Blog
Add a User Online Tracker to Blog
How many people is online at your blog? you know that or don't? If you don't know how many people is online at your blog, you can use a free tracker to know it. That is much site provide this service. Once of them is www.histats.com. If you use them tool, you can know how many people online at your blog, how many people was visited to your blog, and any function. This is once of example :
How to get it? please following the steps :
- Please visit www.histats.com.
- If you was on the histats site, click Register at the top tab.
- Content the form with your information, such as email, password, your blog url and etc.
- Click Continue button.
- Choose the style of histats counter, click Choose a counter from this category.
- Please mark the radio button beside the counter style you wanted.
- Click Continue button at the bottom of page.
- Click at the drop down menu, choose the category which to display at your counter. the choice is : visitor today, Page views today, User online, Total visitors, and total page views. Choose empty if you want not to display them.
- Click Continue button.
- Wait a moment, your counter is updating.
- Until the process is done, copy your counter code and paste to the Notepad or other text editor. Save into your computer.
- Logout and close your internet browser.
- Done. Now you has have a counter code to add at your blog.
Next step is add your counter code to your blog, please following the steps :
- Login to blogger with your ID.
- After entering the dasboard page , click Layout. Please saw the picture :
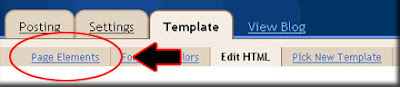
- Click at Page Element tab. See the picture below :
- Click at Add a Page element.
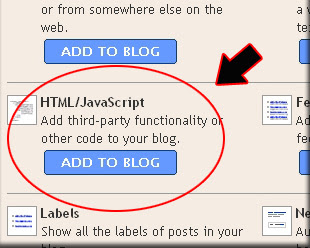
- After emerging pop up window , Klik add to blog button for the things HTML/JavaScript. See the picture following :
- Open your Counter code, copy and then paste into available column.
- Click
- Done. Please see the result.
Now you have a Counter, and you will know how many people online at your blog.
If you don't like with this counter, you can get at the other site, this is several site provide the same service :
See you next time at my new tips. Happy blogging.
Add a shoutbox to blog
Once of my friend ask to me, how to add a shoutbox to blog?
Allright, before i answer this question you must know what is shoutbox? shoutbox is a little box for sending a short message, with shoutbox you can chat with your blog visitor. An example of shoutbox is be like this :
- Please visit http://www.shoutmix.com.
- Before you must register, please click "CREAT YOUR SHOUTBOX NOW", or you can click "SIGN UP" at upper tab.
- If you are has registered at shoutmix, please login with your ID.
- At the column with title Style, click appearance.
- Then click pull down menu beside Load From Preset for setting your shoutbox, please select which you want. If it is done, don't forget to click Save Setting.
- To get HTML code for your shoutbox, please click "Use Shoutbox"
- Click at "Place Shoutbox on web page", write the width and hight you want.
- Copy all of the HTML code at text area below of "Generated Codes", paste at notpad and then save to your computer.
- Click "Log out" and then close.
- Done. now you have a shoutbox code for add to your blog.
Now you can add your shoutbox code to your blog, please following the steps :
- Login to blogger with your ID.
- After entering the dasboard page , click Layout. Please saw the picture :
- Click at Page Element tab. See the picture below :
- Click at Add a Page element.
- After emerging pop up window , Klik add to blog button for the things HTML/JavaScript. See the picture following :
- Open your Shoutbox code, copy and then paste into available column.
- Click
- Done. Please see the result.
Now you have a Shoutbox at your blog.
See you next time at my new post brother. Happy blogging.
Make a Table Of Content
Do you like to read the book? your answer surely will immeasurable, there is to answer to like and there is also to answer don't like. But I sure you have read a book. In a book is be one named by table of contents, with table of contents will make the reader the book easy to find the parts the content of a book wishing in reading. The question possibly emerge is what is his relation between books with blog? there is, do not only a book that can make the table of contents, in a blog even also we can do it,
There is 2 steps to make a Table Of content at the blog :
Step #1
- Login to blogger with your ID.
- After entering the dashboard page , click Layout.
- Then click edit HTML tab.
- Click the Download full template link. Save your template.
- Please mark the little box beside Expand Widget Templates. Wait for a moment.

- Go to your template code, and find the code like this :
<b:include data='post' name='post'/> - Delete above code, and replace with the following code :
- Click Save Template button
- Done.
Step #2
- Click at Page Element tab.
- Click at Add a Page element.
- After emerging pop up window , Klik add to blog button for the things HTML/JavaScript.
- Copy and paste the code below into available column :
<a href="http://YourBlogName.blogspot.com/search?max-results=200">Show all post »»</a> - Alter YourBlogName with your blog name. Example : my blog name is 1-freedownload. Alter 200 with other number, because this is the sum of how much post want to show.
- Click
- Finish. Please see the result.
Now you have a Table Of Content at your blog.
See you at my next post. Don't miss it.
Add Yahoo! Messenger Emoticons to blog
If you often chatting with yahoo! messenger, possibly you will familiar with emoticons such as : ![]()
![]()
![]()
![]()
 tab, don't at
  tab. This is the codes :
:)happy
gif" width="18" height="18" border="0">
:(sad
gif" width="18" height="18" border="0">
;)winking
gif" width="18" height="18" border="0">
:Dbig grin
gif" width="18" height="18" border="0">
;;)batting eyelashes
gif" width="18" height="18" border="0">
>:D
gif" width="18" height="18" border="0">
:-/confused
gif" width="18" height="18" border="0">
:xlove struck
gif" width="18" height="18" border="0">
:">blushing
gif" width="18" height="18" border="0">
:Ptongue
gif" width="18" height="18" border="0">
:-*kiss
gif" width="18" height="18" border="0">
=((broken heart
gif" width="18" height="18" border="0">
:-Osurprise
gif" width="18" height="18" border="0">
X(angry
gif" width="18" height="18" border="0">
:>smug
gif" width="18" height="18" border="0">
B-)cool
gif" width="18" height="18" border="0">
:-Sworried
gif" width="18" height="18" border="0">
#:-Swhew!
gif" width="34" height="18" border="0">
>:)devil
gif" width="18" height="18" border="0">
:((crying
gif" width="22" height="18" border="0">
:))laughing
gif" width="18" height="18" border="0">
:straight face
gif" width="18" height="18" border="0">
/:)raised eyebrow
gif" width="18" height="18" border="0">
=))rolling on the floor
gif" width="30" height="18" border="0">
O:-)angel
gif" width="30" height="18" border="0">
:-Bnerd
gif" width="24" height="18" border="0">
=;talk to the hand
gif" width="18" height="18" border="0">
Yahoo hidden emoticons
:o3puppy dog eyes - New!
gif" width="31" height="18" border="0">
:-??I don't know
gif" width="40" height="18" border="0">
%-(not listening
gif" width="52" height="18" border="0">
:@)pig
gif" width="18" height="18" border="0">
3:-Ocow
gif" width="18" height="18" border="0">
:()monkey
gif" width="21" height="18" border="0">
~:>chicken
gif" width="18" height="18" border="0">
@};-rose
gif" width="18" height="18" border="0">
%%-good luck
gif" width="18" height="18" border="0">
**==flag
gif" width="25" height="18" border="0">
(~~)pumpkin
gif" width="17" height="18" border="0">
~O)coffee
gif" width="18" height="18" border="0">
*-:)idea
gif" width="30" height="18" border="0">
8-Xskull
gif" width="18" height="18" border="0">
=:)bug
gif" width="20" height="18" border="0">
>-)alien
gif" width="18" height="18" border="0">
:-Lfrustrated
gif" width="18" height="18" border="0">
[-O
gif" width="18" height="18" border="0">
$-)money eyes
gif" width="18" height="18" border="0">
:-"whistling
gif" width="22" height="18" border="0">
b-(feeling beat up
gif" width="18" height="18" border="0">
:)>-peace sign
gif" width="22" height="18" border="0">
[-Xshame on you
gif" width="22" height="18" border="0">
\:D/dancing
gif" width="26" height="18" border="0">
>:/bring it on
gif" width="23" height="18" border="0">
;))hee hee
gif" width="18" height="18" border="0">
:-@chatterbox
gif" width="36" height="18" border="0">
^:)^not worthy
gif" width="32" height="18" border="0">
:-joh go on
gif" width="26" height="18" border="0">
(*)star
gif" width="18" height="18" border="0">
o->hiro
gif" width="18" height="18" border="0">
o=>billy
gif" width="18" height="18" border="0">
o-+april
gif" width="18" height="18" border="0">
(%)yin yang
gif" width="18" height="18" border="0">
This is the steps to add YM emoticons
When you post your article, choose
tab. Write your article, and add some emoticons where you want at your post. For example : Hi everybody, today i feel because i'm Besides above steps, there is other way which more simple that is as follows :
- You must used Firefox browser when you following this tutorial.
- Open your Firefox browser
- Install greas monkey, please click here!
- Click this script, and then click install.
- Go to yout template editor, and find this code
]]> - Copy and paste following codes above of
]]> - Click Save Template button.
- Done.
img.emoticon { padding: 0; margin: 0; border: 0; }
After this, you will see the emoticons at your post Editor. However it only at
tab editor. Screenshot : 
Remember, this is work at Firefox, not for internet explorer. Beside at my blog, you can read this tutorial at this blog and that blog. See you at my next post. Don't miss it.
